This article references teachings of Dr. Michael Wenzel from his Inside Dentistry CE Webinar: Fundamentals of Microscope-Assisted Restorative Dentistry. Dr. Michael Wenzel is a General Practitioner based in Alberta, CA.
If you're seriously considering a dental microscope for your practice or satellite office, a question that you may need to start considering is where is the best spot to install my microscope (and maximize space).
This may seem obvious after you read this, but it remains true with many doctors using scopes… if your scope is not positioned or mounted with easy access around your operatory, it will simply not be used.
Getting this right is the first step in maximizing the value of your scope, not just in how it's used but also how you'll feel using it. Here at Global, we want you to be as comfortable as possible, that's why ergonomics is a core component of how we've designed the Global A-Series microscope (in addition to illumination and magnification).
Today, we're covering a 2-part positioning guide to help you get the most from your scope, including both: where the scope is installed and then how you'll use it to maximize your comfort.
Our hope is that by reading this ahead, you'll have a visual foundation to apply in the real-world - giving you a leg up on your learning curve from using a scope.
Part 1: Installation
Most dental microscopes can either be permanently mounted to the floor, wall or ceiling or attached on a movable floor stand. Consult your manufacturer or owner’s manual when planning your scope installation. While every operatory is unique, they’ve likely worked with numerous different configurations to help you maximize your setup.
Getting the best configuration for your scope all depends on how much space you have to work with in the room, and what other features in the room need to be configured to.
Also, consider how you’ll incorporate audio/visual with a live feed monitor for assistant/staff/patient viewing.
Per the Global Surgical owner’s manual: The most common mounting location for ceiling mount and floor mount models is over the patient’s left hip. A wall mount is most typically mounted on right side.

For more guidance on planning for your dental microscope installation, check out our article: How to Mount a Dental Microscope.
Part 2: Positioning for the Best Ergonomics
Now that you've mapped out where your scope will be installed, next is time to get familiar with positioning your body/chair relative to the scope and your patient. Getting this right means you'll be the most comfortable throughout the day, and can even shorten your learning curve on a scope.
Poor positioning is another common mistake that dentists can make, ultimately sacrificing their comfort during the learning curve. Ergonomic positioning applies in a number of ways, primarily:
1. Microscope mount2. Doctor stool
3. Doctor head
4. Patient in the chair
- Learning how to effectively position your scope so that the operating field or target tooth can be visualized is part of getting comfortable with your scope. To get acclimated, some doctors seek formal training, while some will learn it through trial and error.
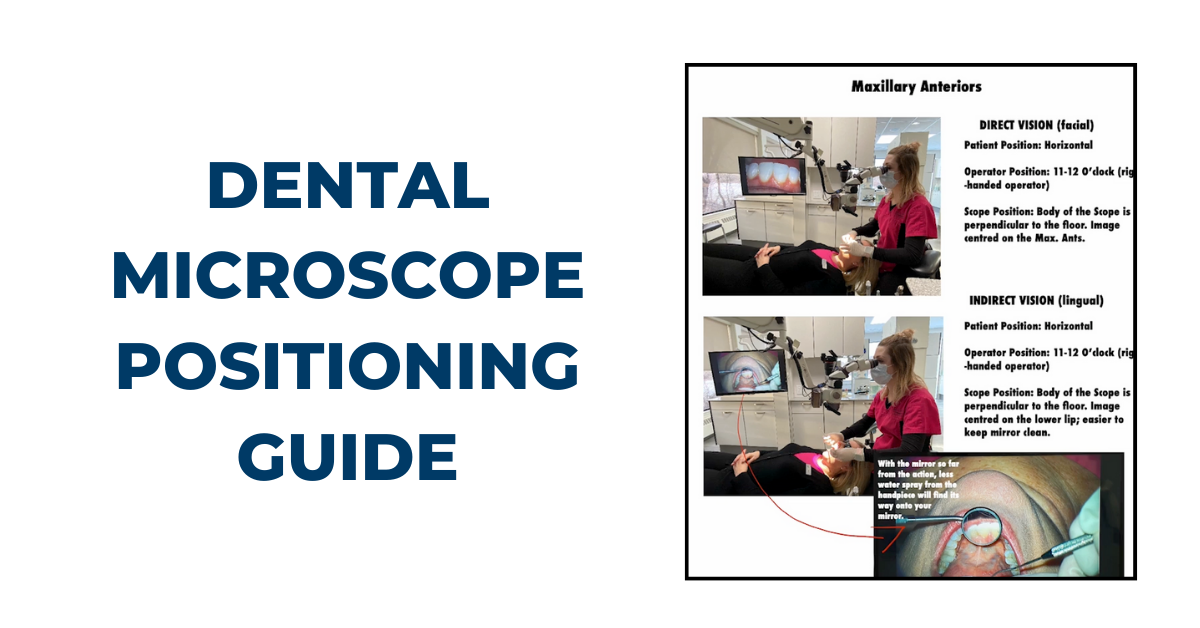
The most important things to be mindful of when learning how to get comfortable with microscope positioning is that in addition to your scope itself, the position of the exam chair, patient’s head and mirror also need to be considered when trying to visualize the operating field or a target tooth.
Below, Dr. Wenzel puts together a visual reference for positioning all four: the scope, your stool, your body/head and your patient - broken down by region of interest. We recommend saving these for visual reference as you begin training, whether using with a mannequin, trialing use with staff for practice, or just troubleshooting why you're not getting the view you're expecting.


For more guidance on this topic, as one of the more significant barriers to comfort during the learning curve – we cover this topic in greater depth in our article: Dental Microscope How-To Guide: Integration & Positioning. We urge you to check out this article for more tips on positioning!
More Value With a Global Microscope
At Global Surgical, we’re committed to your success, with durable products and our knowledgeable Technical & Customer Service teams. And, we guarantee your peace of mind with our limited lifetime warranty (US & Canada only).
Many of the doctors we speak with begin using their scopes with nearly every patient – from observation and diagnosis to treatment planning and procedure, so we know it’s important they are able to use their scope effectively.
Questions? Reach Out!
If you’re just getting started with a dental microscope, or considering adding a scope to your practice, we are here to help! We can help configure and customize your scope to your clinical needs, helping you get started as quickly as possible. Our Technical & Customer Service teams are rated among the best in the business.
In fact, one doctor reviewed his experience at Global as: “I have never purchased a product that had better customer service than my Global Microscope. It’s great to know that I can pick up the phone and have an entire team of experienced professionals willing to help me promptly.” – Dr. Osvaldo Z. Mayoral, D.M.D.
Get started by reaching out to us at 800-861-3585 or by clicking the button below.

.png)